Appearance
PyQt布局
- 在Qt里面布局分为四个大类:
QBoxLayout盒子式布局
QGridLayout网格式布局
QFormLayout表单式布局
QStackedLayout抽屉式布局
一、QBoxLayout盒子式布局
- 一般使用它的两个子类
QVBoxLayou和QHBoxLayout负责垂直和水平布局
垂直的:vertical
水平的:horizontal
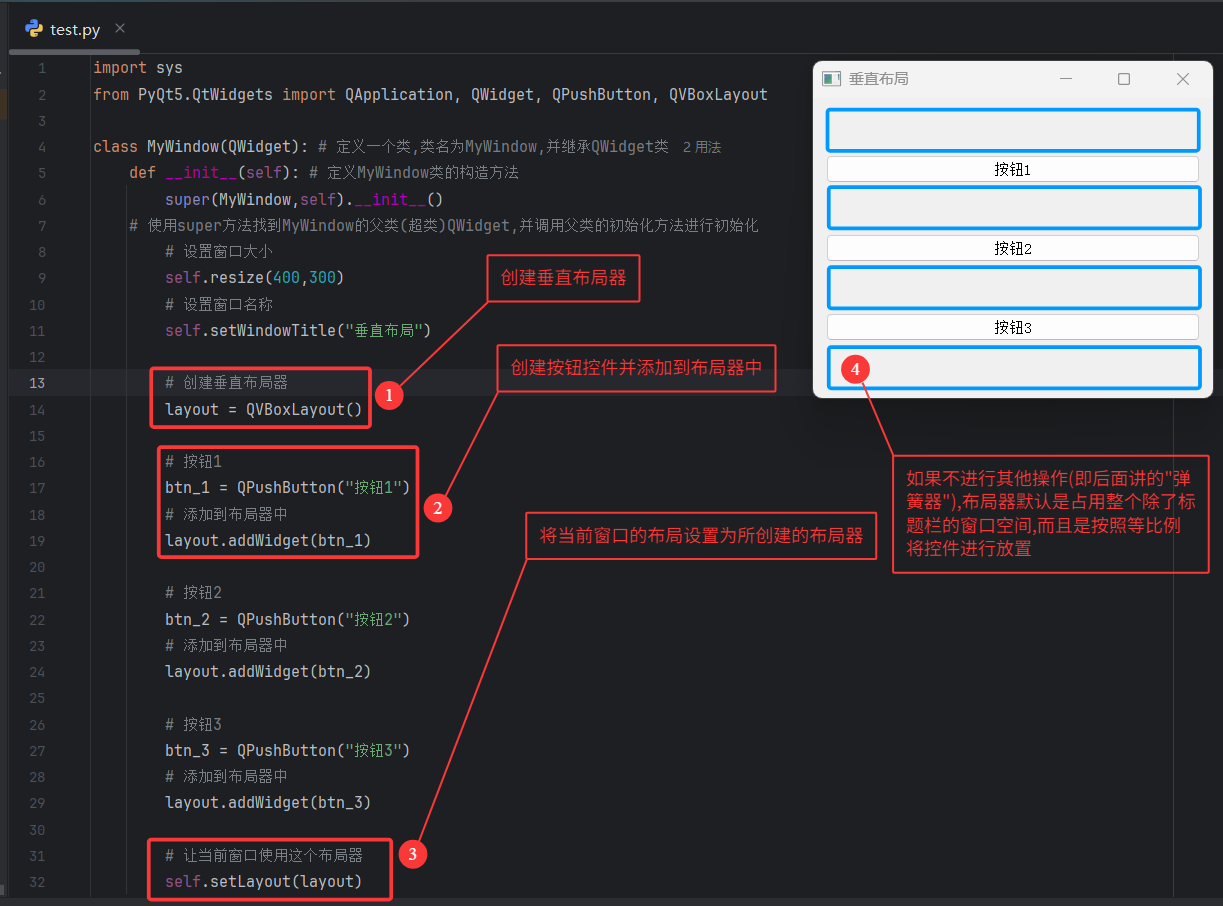
1. 垂直布局
不使用"弹簧器"情况下
程序源码
python
import sys
from PyQt5.QtWidgets import QApplication, QWidget, QPushButton, QVBoxLayout

class MyWindow(QWidget): # 定义一个类,类名为MyWindow,并继承QWidget类
    def __init__(self): # 定义MyWindow类的构造方法
        super(MyWindow,self).__init__()
    # 使用super方法找到MyWindow的父类(超类)QWidget,并调用父类的初始化方法进行初始化
        # 设置窗口大小
        self.resize(400,300)
        # 设置窗口名称
        self.setWindowTitle("垂直布局")

        # 创建垂直布局器
        layout = QVBoxLayout()

        # 按钮1
        btn_1 = QPushButton("按钮1")
        # 添加到布局器中
        layout.addWidget(btn_1)

        # 按钮2
        btn_2 = QPushButton("按钮2")
        # 添加到布局器中
        layout.addWidget(btn_2)

        # 按钮3
        btn_3 = QPushButton("按钮3")
        # 添加到布局器中
        layout.addWidget(btn_3)

        # 让当前窗口使用这个布局器
        self.setLayout(layout)

if __name__=='__main__':
    # 获取参数列表
    app = QApplication(sys.argv)

    # 创建自定义的w窗口
    w = MyWindow()
    # 显示窗口
    w.show()
    # 循环运行程序,直到人为退出
    app.exec()
源码讲解
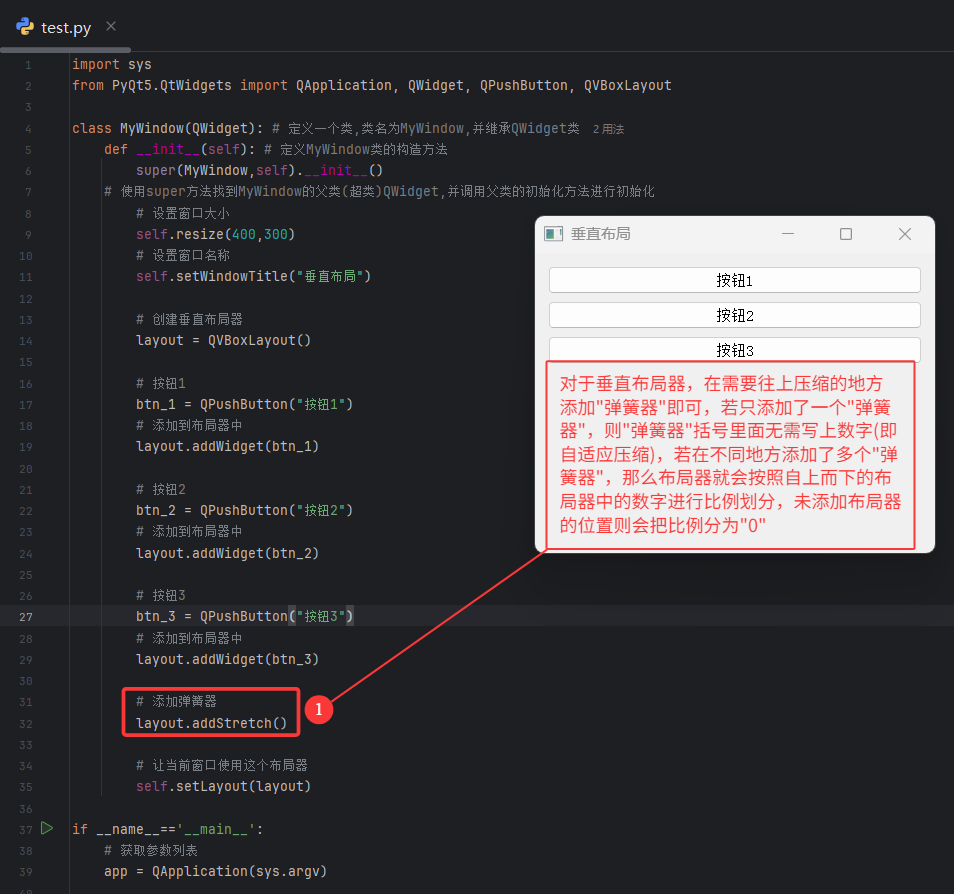
使用"弹簧器"情况下
- 自适应压缩(即只创建了一个"弹簧器")
程序源码
python
import sys
from PyQt5.QtWidgets import QApplication, QWidget, QPushButton, QVBoxLayout

class MyWindow(QWidget): # 定义一个类,类名为MyWindow,并继承QWidget类
    def __init__(self): # 定义MyWindow类的构造方法
        super(MyWindow,self).__init__()
    # 使用super方法找到MyWindow的父类(超类)QWidget,并调用父类的初始化方法进行初始化
        # 设置窗口大小
        self.resize(400,300)
        # 设置窗口名称
        self.setWindowTitle("垂直布局")

        # 创建垂直布局器
        layout = QVBoxLayout()

        # 按钮1
        btn_1 = QPushButton("按钮1")
        # 添加到布局器中
        layout.addWidget(btn_1)

        # 按钮2
        btn_2 = QPushButton("按钮2")
        # 添加到布局器中
        layout.addWidget(btn_2)

        # 按钮3
        btn_3 = QPushButton("按钮3")
        # 添加到布局器中
        layout.addWidget(btn_3)

        # 添加弹簧器
        layout.addStretch()

        # 让当前窗口使用这个布局器
        self.setLayout(layout)

if __name__=='__main__':
    # 获取参数列表
    app = QApplication(sys.argv)

    # 创建自定义的w窗口
    w = MyWindow()
    # 显示窗口
    w.show()
    # 循环运行程序,直到人为退出
    app.exec()
源码讲解
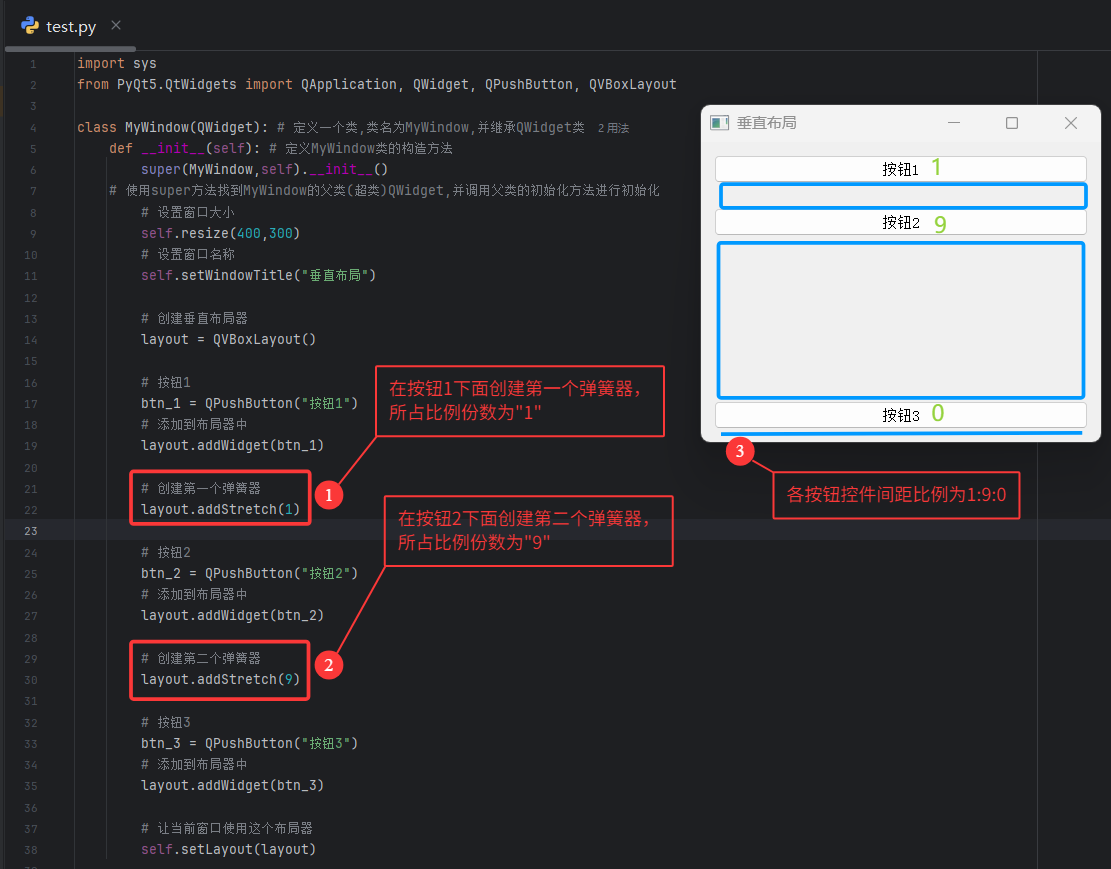
- 按照比例压缩(即创建了两个及两个以上"弹簧器")
程序源码
python
import sys
from PyQt5.QtWidgets import QApplication, QWidget, QPushButton, QVBoxLayout

class MyWindow(QWidget): # 定义一个类,类名为MyWindow,并继承QWidget类
    def __init__(self): # 定义MyWindow类的构造方法
        super(MyWindow,self).__init__()
    # 使用super方法找到MyWindow的父类(超类)QWidget,并调用父类的初始化方法进行初始化
        # 设置窗口大小
        self.resize(400,300)
        # 设置窗口名称
        self.setWindowTitle("垂直布局")

        # 创建垂直布局器
        layout = QVBoxLayout()

        # 按钮1
        btn_1 = QPushButton("按钮1")
        # 添加到布局器中
        layout.addWidget(btn_1)

        # 创建第一个弹簧器
        layout.addStretch(1)

        # 按钮2
        btn_2 = QPushButton("按钮2")
        # 添加到布局器中
        layout.addWidget(btn_2)

        # 创建第二个弹簧器
        layout.addStretch(9)

        # 按钮3
        btn_3 = QPushButton("按钮3")
        # 添加到布局器中
        layout.addWidget(btn_3)

        # 让当前窗口使用这个布局器
        self.setLayout(layout)

if __name__=='__main__':
    # 获取参数列表
    app = QApplication(sys.argv)

    # 创建自定义的w窗口
    w = MyWindow()
    # 显示窗口
    w.show()
    # 循环运行程序,直到人为退出
    app.exec()
源码讲解
2. 水平布局
不使用"弹簧器"情况下
程序源码
python
import sys
from PyQt5.QtWidgets import QApplication, QWidget, QPushButton, QHBoxLayout

class MyWindow(QWidget): # 定义一个类,类名为MyWindow,并继承QWidget类
    def __init__(self): # 定义MyWindow类的构造方法
        super(MyWindow,self).__init__()
    # 使用super方法找到MyWindow的父类(超类)QWidget,并调用父类的初始化方法进行初始化
        # 设置窗口大小
        self.resize(400,300)
        # 设置窗口名称
        self.setWindowTitle("水平布局")

        # 创建水平布局器
        layout = QHBoxLayout()

        # 按钮1
        btn_1 = QPushButton("按钮1")
        # 添加到布局器中
        layout.addWidget(btn_1)

        # 按钮2
        btn_2 = QPushButton("按钮2")
        # 添加到布局器中
        layout.addWidget(btn_2)

        # 按钮3
        btn_3 = QPushButton("按钮3")
        # 添加到布局器中
        layout.addWidget(btn_3)

        # 让当前窗口使用这个布局器
        self.setLayout(layout)

if __name__=='__main__':
    # 获取参数列表
    app = QApplication(sys.argv)

    # 创建自定义的w窗口
    w = MyWindow()
    # 显示窗口
    w.show()
    # 循环运行程序,直到人为退出
    app.exec()
源码讲解
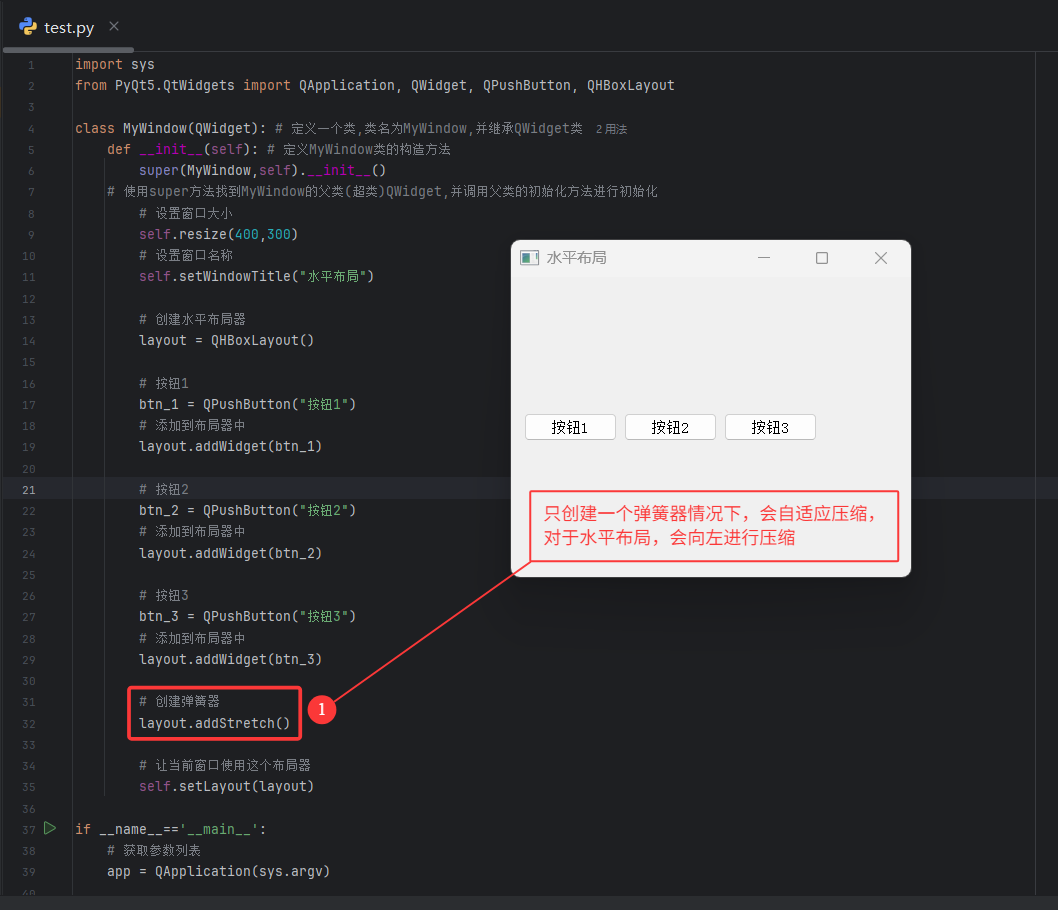
使用"弹簧器"情况下
- 自适应压缩(即只创建了一个"弹簧器")
程序源码
python
import sys
from PyQt5.QtWidgets import QApplication, QWidget, QPushButton, QHBoxLayout

class MyWindow(QWidget): # 定义一个类,类名为MyWindow,并继承QWidget类
    def __init__(self): # 定义MyWindow类的构造方法
        super(MyWindow,self).__init__()
    # 使用super方法找到MyWindow的父类(超类)QWidget,并调用父类的初始化方法进行初始化
        # 设置窗口大小
        self.resize(400,300)
        # 设置窗口名称
        self.setWindowTitle("水平布局")

        # 创建水平布局器
        layout = QHBoxLayout()

        # 按钮1
        btn_1 = QPushButton("按钮1")
        # 添加到布局器中
        layout.addWidget(btn_1)

        # 按钮2
        btn_2 = QPushButton("按钮2")
        # 添加到布局器中
        layout.addWidget(btn_2)

        # 按钮3
        btn_3 = QPushButton("按钮3")
        # 添加到布局器中
        layout.addWidget(btn_3)

        # 创建弹簧器
        layout.addStretch()

        # 让当前窗口使用这个布局器
        self.setLayout(layout)

if __name__=='__main__':
    # 获取参数列表
    app = QApplication(sys.argv)

    # 创建自定义的w窗口
    w = MyWindow()
    # 显示窗口
    w.show()
    # 循环运行程序,直到人为退出
    app.exec()
源码讲解
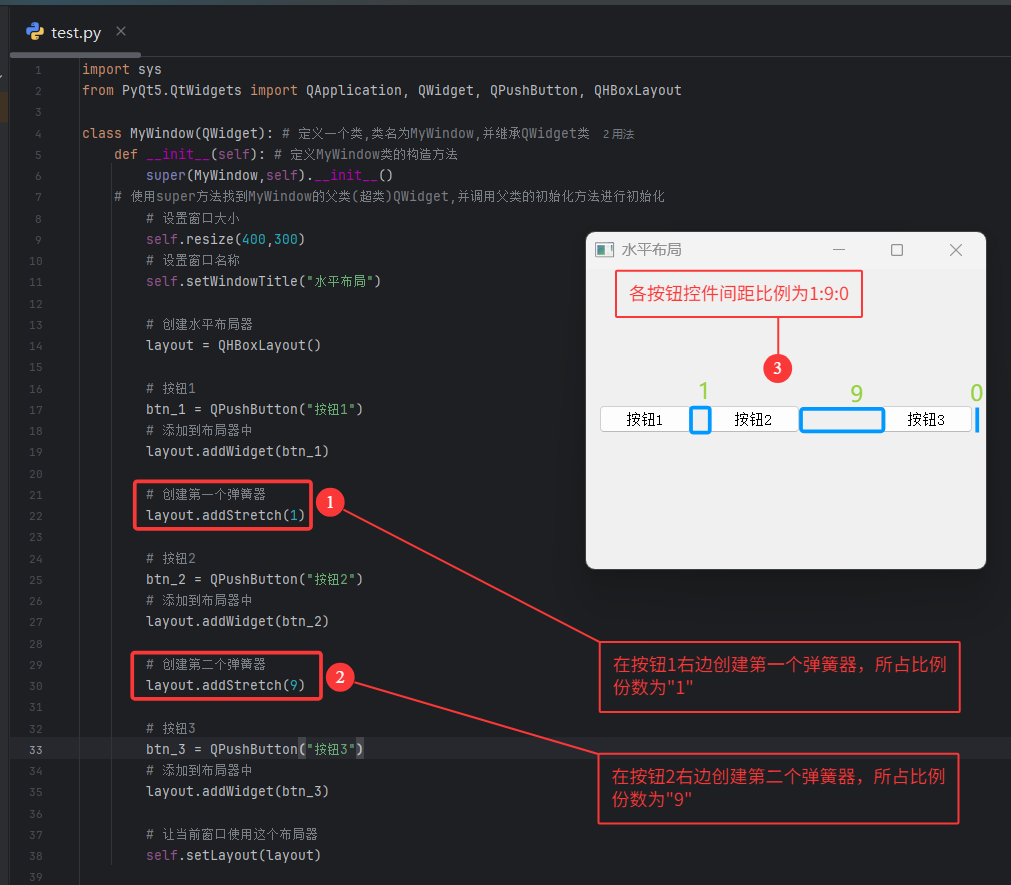
- 按照比例压缩(即创建了多个"弹簧器")
程序源码
python
import sys
from PyQt5.QtWidgets import QApplication, QWidget, QPushButton, QHBoxLayout

class MyWindow(QWidget): # 定义一个类,类名为MyWindow,并继承QWidget类
    def __init__(self): # 定义MyWindow类的构造方法
        super(MyWindow,self).__init__()
    # 使用super方法找到MyWindow的父类(超类)QWidget,并调用父类的初始化方法进行初始化
        # 设置窗口大小
        self.resize(400,300)
        # 设置窗口名称
        self.setWindowTitle("水平布局")

        # 创建水平布局器
        layout = QHBoxLayout()

        # 按钮1
        btn_1 = QPushButton("按钮1")
        # 添加到布局器中
        layout.addWidget(btn_1)

        # 创建第一个弹簧器
        layout.addStretch(1)

        # 按钮2
        btn_2 = QPushButton("按钮2")
        # 添加到布局器中
        layout.addWidget(btn_2)

        # 创建第二个弹簧器
        layout.addStretch(9)

        # 按钮3
        btn_3 = QPushButton("按钮3")
        # 添加到布局器中
        layout.addWidget(btn_3)

        # 让当前窗口使用这个布局器
        self.setLayout(layout)

if __name__=='__main__':
    # 获取参数列表
    app = QApplication(sys.argv)

    # 创建自定义的w窗口
    w = MyWindow()
    # 显示窗口
    w.show()
    # 循环运行程序,直到人为退出
    app.exec()
源码讲解
整体基础实战
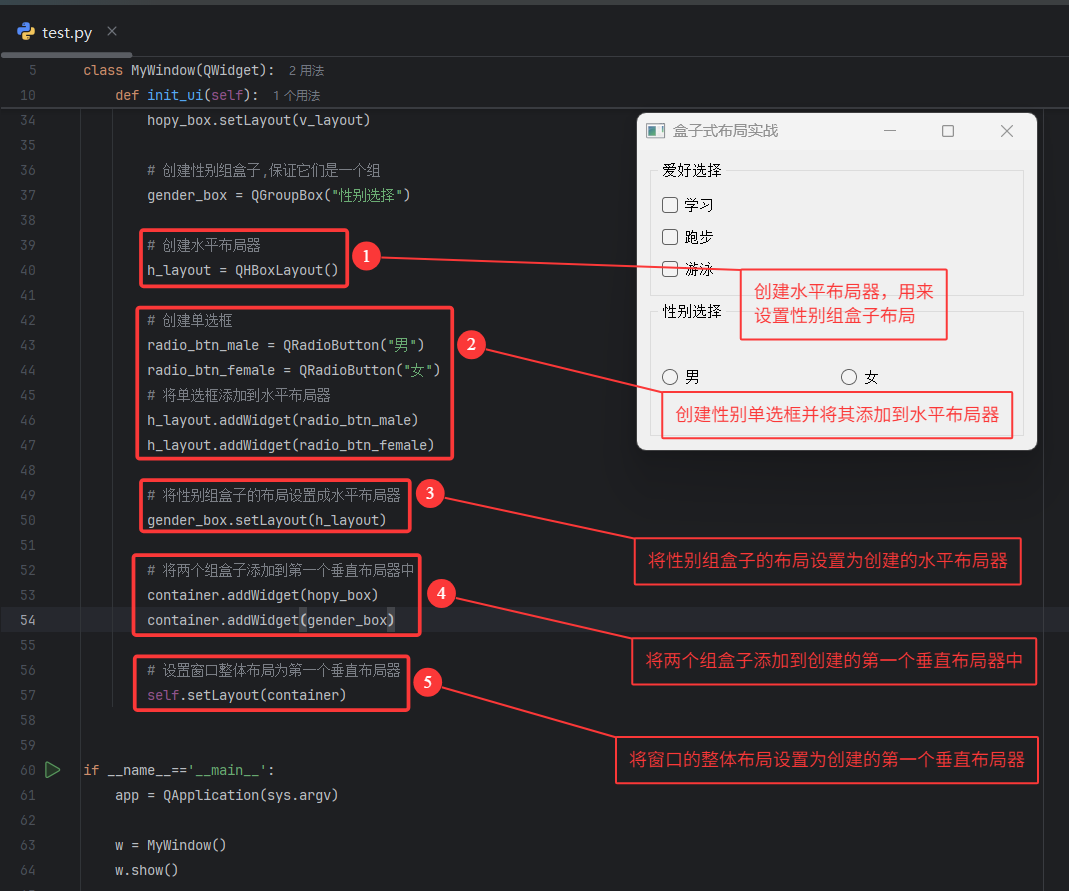
- 制作一个用户爱好选择、性别选择的UI界面,其中爱好选择使用垂直布局,性别选择使用水平布局,最后两个布局器再整体使用垂直布局(注意:虽然窗口只能使用一个布局器,但是布局器可以进行嵌套,可以先进行嵌套设计,最终组成的布局器再提供给窗口调用)
程序源码
python
import sys
from PyQt5.QtWidgets import QApplication, QWidget, QVBoxLayout, QGroupBox, QCheckBox, QHBoxLayout, QRadioButton


class MyWindow(QWidget):
    def __init__(self):
        super(MyWindow,self).__init__()
        self.init_ui()

    def init_ui(self):
        self.setWindowTitle("盒子式布局实战")
        self.resize(400,300)

        # 创建第一个垂直布局器
        container = QVBoxLayout()

        # 创建兴趣组盒子
        hopy_box = QGroupBox("爱好选择")

        # 创建第二个垂直布局器
        v_layout = QVBoxLayout()

        # 创建爱好复选框
        check_btn_studying = QCheckBox("学习")
        check_btn_running = QCheckBox("跑步")
        check_btn_swinging = QCheckBox("游泳")

        # 将爱好复选框添加到第二个垂直布局器中
        v_layout.addWidget(check_btn_studying)
        v_layout.addWidget(check_btn_running)
        v_layout.addWidget(check_btn_swinging)

        # 设置兴趣组盒子布局为第二个垂直布局器
        hopy_box.setLayout(v_layout)

        # 创建性别组盒子
        gender_box = QGroupBox("性别选择")

        # 创建水平布局器
        h_layout = QHBoxLayout()

        # 创建单选框
        radio_btn_male = QRadioButton("男")
        radio_btn_female = QRadioButton("女")

        # 将单选框添加到水平布局器
        h_layout.addWidget(radio_btn_male)
        h_layout.addWidget(radio_btn_female)

        # 将性别组盒子的布局设置成水平布局器
        gender_box.setLayout(h_layout)

        # 将两个组盒子添加到第一个垂直布局器中
        container.addWidget(hopy_box)
        container.addWidget(gender_box)

        # 设置窗口整体布局为第一个垂直布局器
        self.setLayout(container)


if __name__=='__main__':
    app = QApplication(sys.argv)

    w = MyWindow()

    w.show()

    app.exec()
源码讲解

二、QGridLayout网格式布局
- 又称九宫格式布局
1. 程序源码
python
import sys
from PyQt5.QtWidgets import QApplication, QWidget, QGridLayout, QPushButton
class MyWindow(QWidget):
def __init__(self):
super(MyWindow,self).__init__()
self.init_ui()
def init_ui(self):
self.setWindowTitle("网格式布局")
self.resize(400,300)
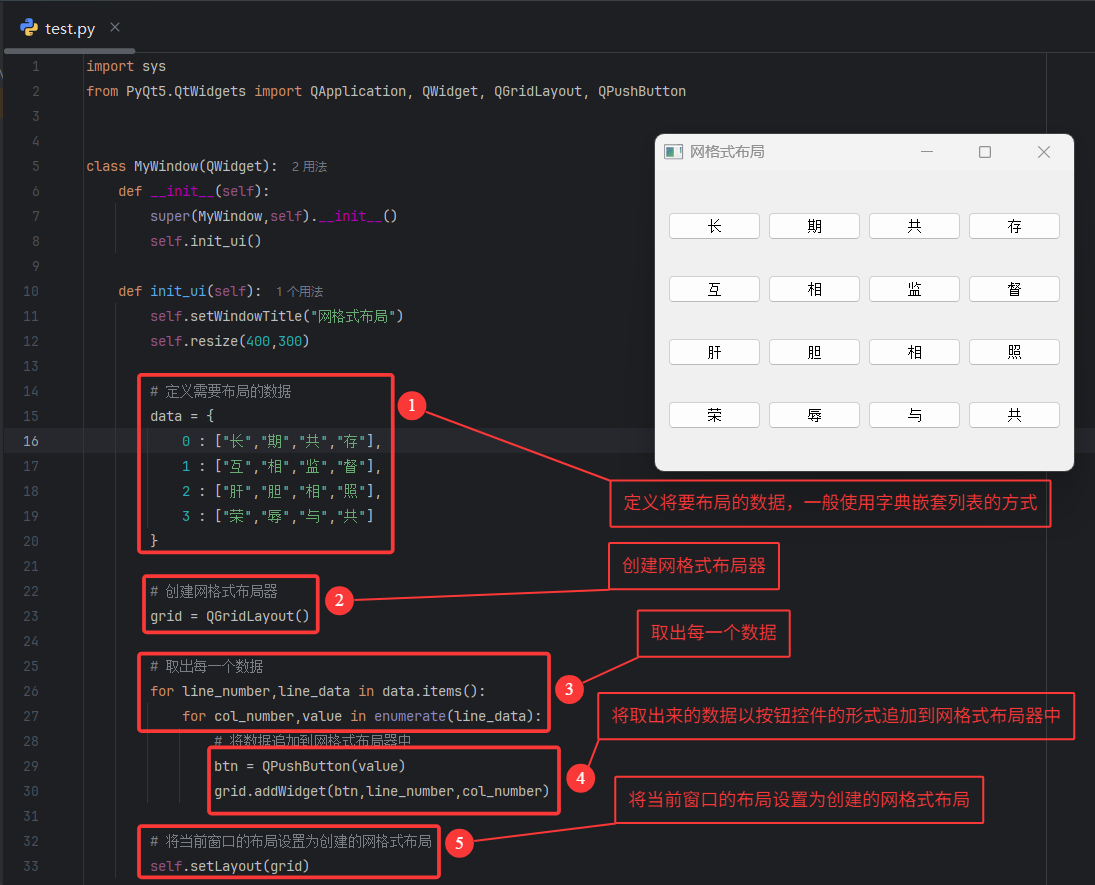
# 定义需要布局的数据
data = {
0 : ["长","期","共","存"],
1 : ["互","相","监","督"],
2 : ["肝","胆","相","照"],
3 : ["荣","辱","与","共"]
}
# 创建网格式布局器
grid = QGridLayout()
# 取出每一个数据
for line_number,line_data in data.items():
for col_number,value in enumerate(line_data):
# 将数据追加到网格式布局器中
btn = QPushButton(value)
grid.addWidget(btn,line_number,col_number)
# 将当前窗口的布局设置为创建的网格式布局
self.setLayout(grid)
if __name__=='__main__':
app = QApplication(sys.argv)
w = MyWindow()
w.show()
app.exec()2. 源码讲解
整体基础实战
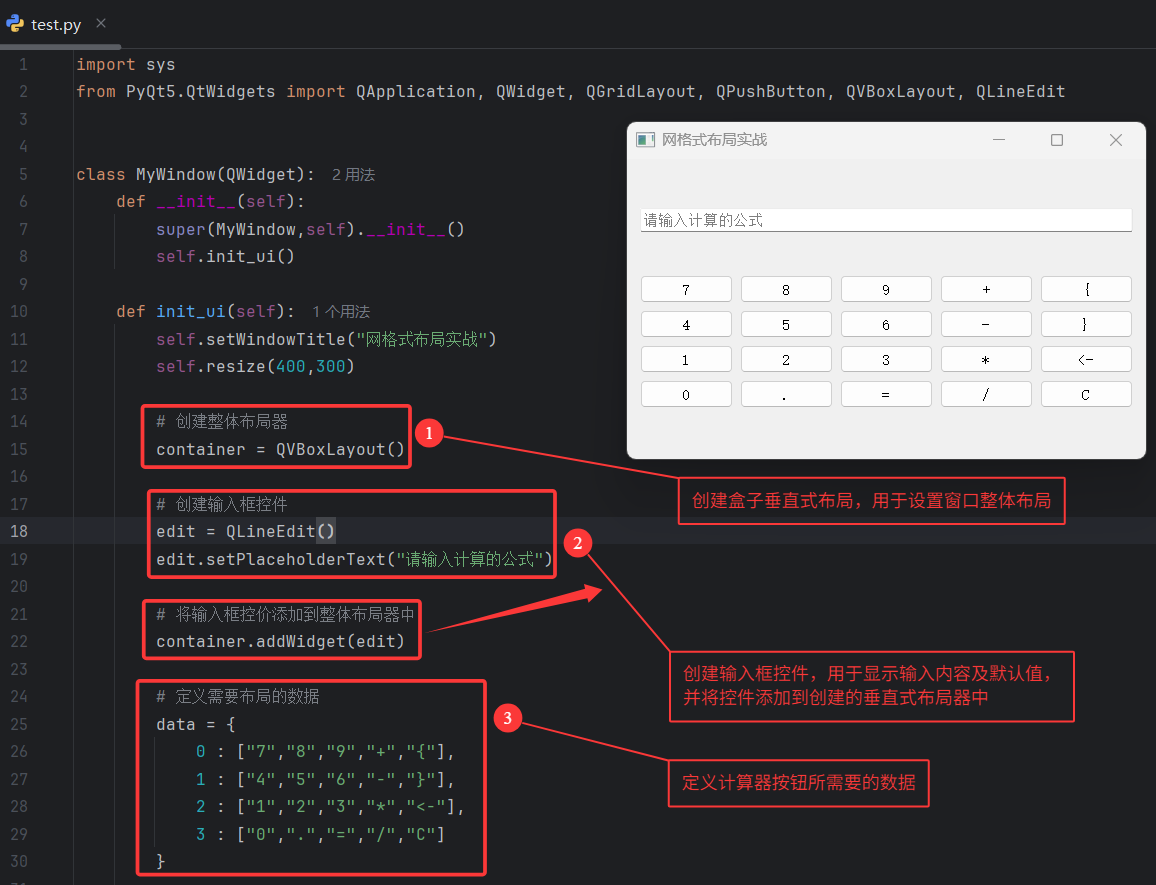
- 做一个简单的计算器UI界面
程序源码
python
import sys
from PyQt5.QtWidgets import QApplication, QWidget, QGridLayout, QPushButton, QVBoxLayout, QLineEdit
class MyWindow(QWidget):
def __init__(self):
super(MyWindow,self).__init__()
self.init_ui()
def init_ui(self):
self.setWindowTitle("网格式布局实战")
self.resize(400,300)
# 创建整体布局器
container = QVBoxLayout()
# 创建输入框控件
edit = QLineEdit()
edit.setPlaceholderText("请输入计算的公式")
# 将输入框控价添加到整体布局器中
container.addWidget(edit)
# 定义需要布局的数据
data = {
0 : ["7","8","9","+","{"],
1 : ["4","5","6","-","}"],
2 : ["1","2","3","*","<-"],
3 : ["0",".","=","/","C"]
}
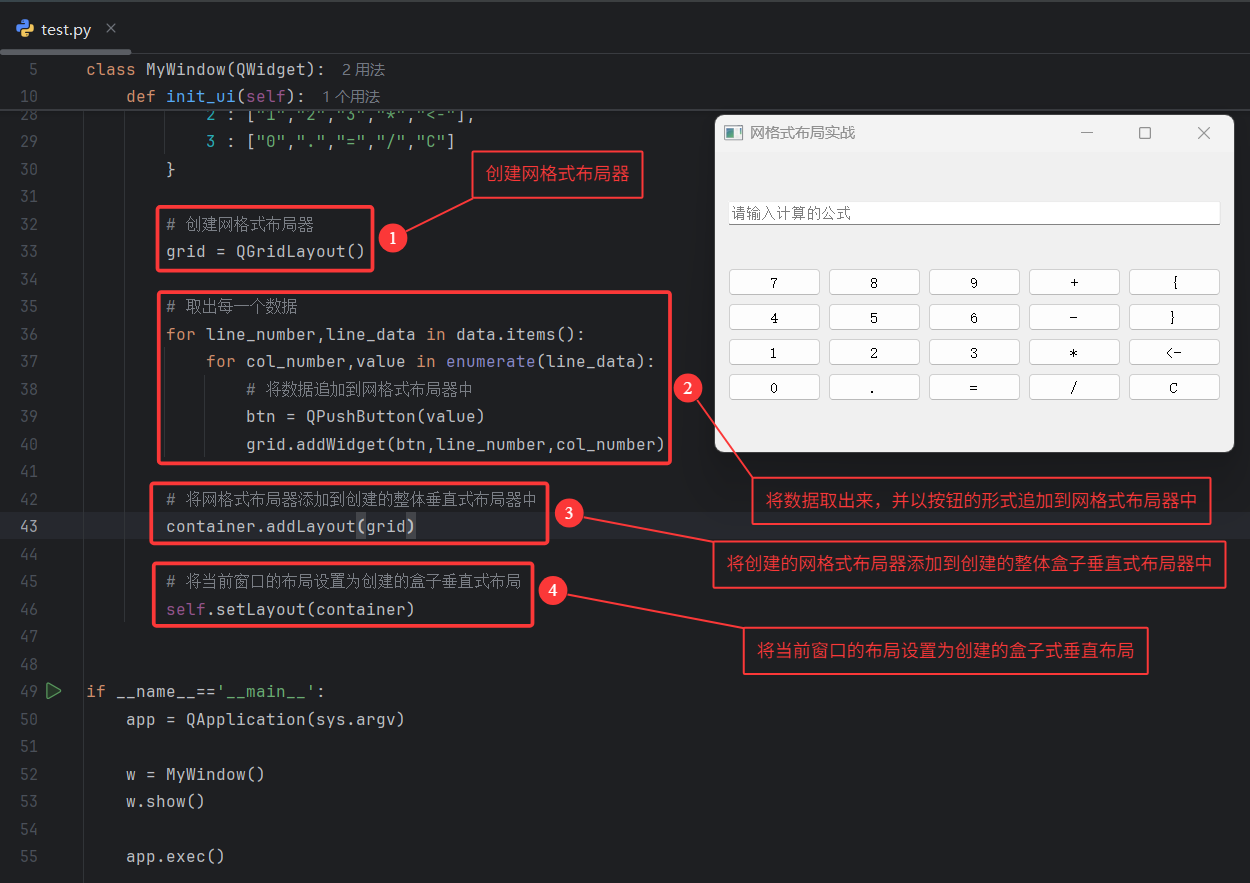
# 创建网格式布局器
grid = QGridLayout()
# 取出每一个数据
for line_number,line_data in data.items():
for col_number,value in enumerate(line_data):
# 将数据追加到网格式布局器中
btn = QPushButton(value)
grid.addWidget(btn,line_number,col_number)
# 将网格式布局器添加到创建的整体垂直式布局器中
container.addLayout(grid)
# 将当前窗口的布局设置为创建的盒子垂直式布局
self.setLayout(container)
if __name__=='__main__':
app = QApplication(sys.argv)
w = MyWindow()
w.show()
app.exec()源码讲解
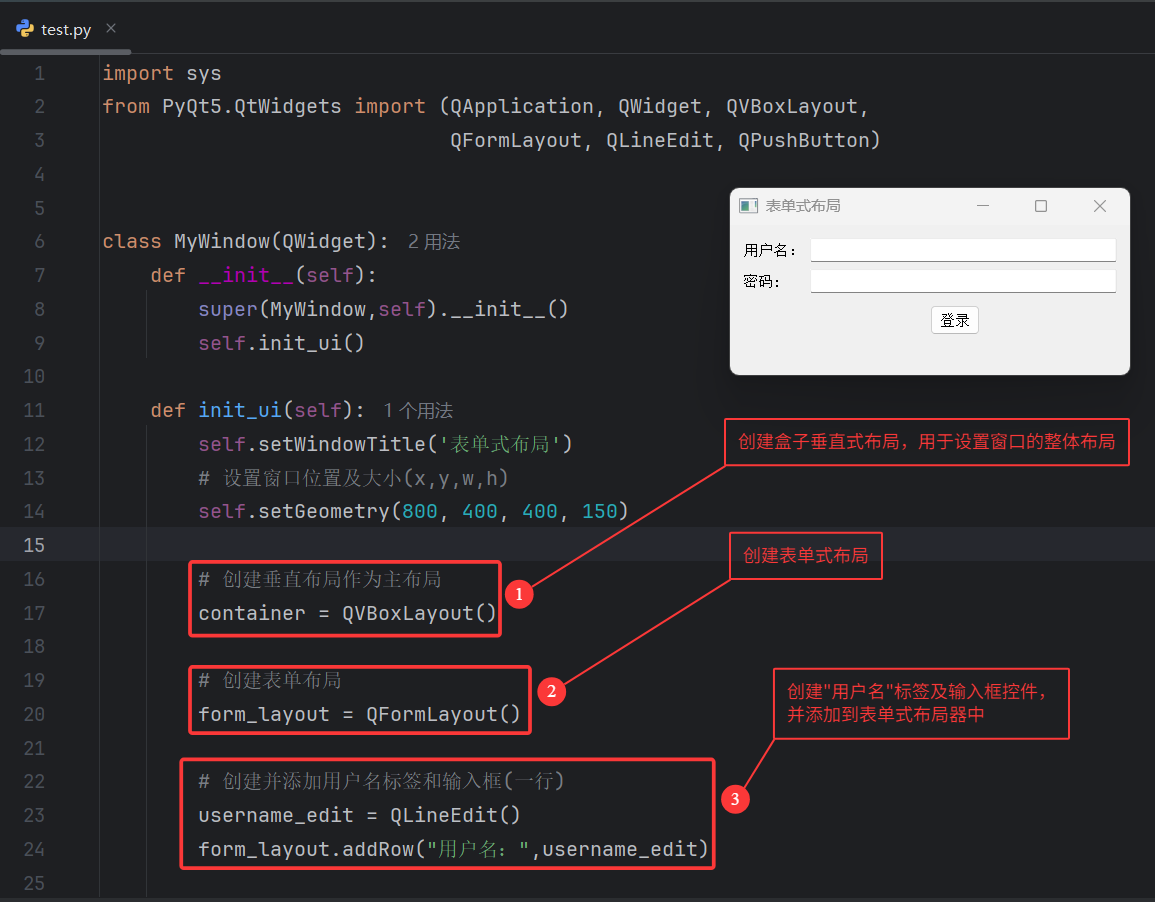
三、QFormLayout表单式布局
- 在实际生产环境及应用中用于制作用户注册表单等,一般用于提交数据的表单制作
1. 程序源码
python
import sys
from PyQt5.QtWidgets import (QApplication, QWidget, QVBoxLayout,
QFormLayout, QLineEdit, QPushButton)
class MyWindow(QWidget):
def __init__(self):
super(MyWindow,self).__init__()
self.init_ui()
def init_ui(self):
self.setWindowTitle('表单式布局')
# 设置窗口位置及大小(x,y,w,h)
self.setGeometry(800, 400, 400, 150)
# 创建垂直布局作为主布局
container = QVBoxLayout()
# 创建表单布局
form_layout = QFormLayout()
# 创建并添加用户名标签和输入框(一行)
username_edit = QLineEdit()
form_layout.addRow("用户名:",username_edit)
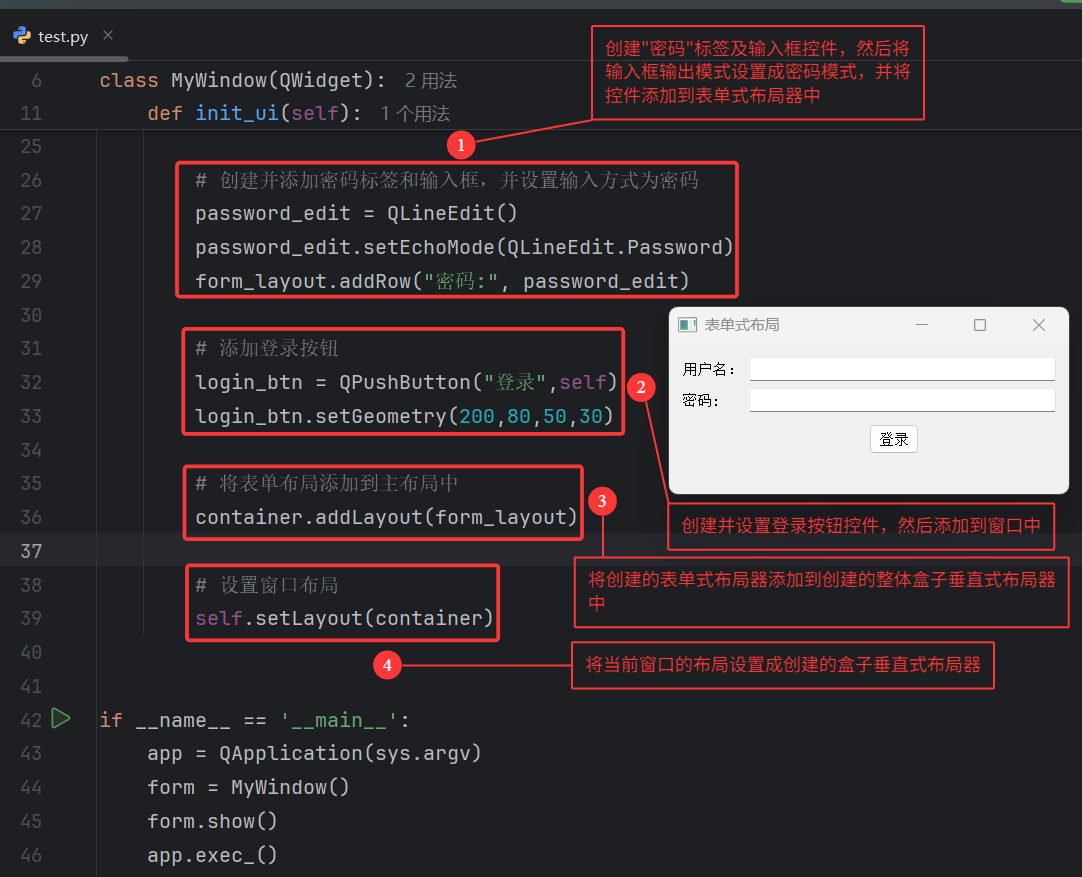
# 创建并添加密码标签和输入框,并设置输入方式为密码
password_edit = QLineEdit()
password_edit.setEchoMode(QLineEdit.Password)
form_layout.addRow("密码:", password_edit)
# 添加登录按钮
login_btn = QPushButton("登录",self)
login_btn.setGeometry(200,80,50,30)
# 将表单布局添加到主布局中
container.addLayout(form_layout)
# 设置窗口布局
self.setLayout(container)
if __name__ == '__main__':
app = QApplication(sys.argv)
form = MyWindow()
form.show()
app.exec_()2. 源码讲解
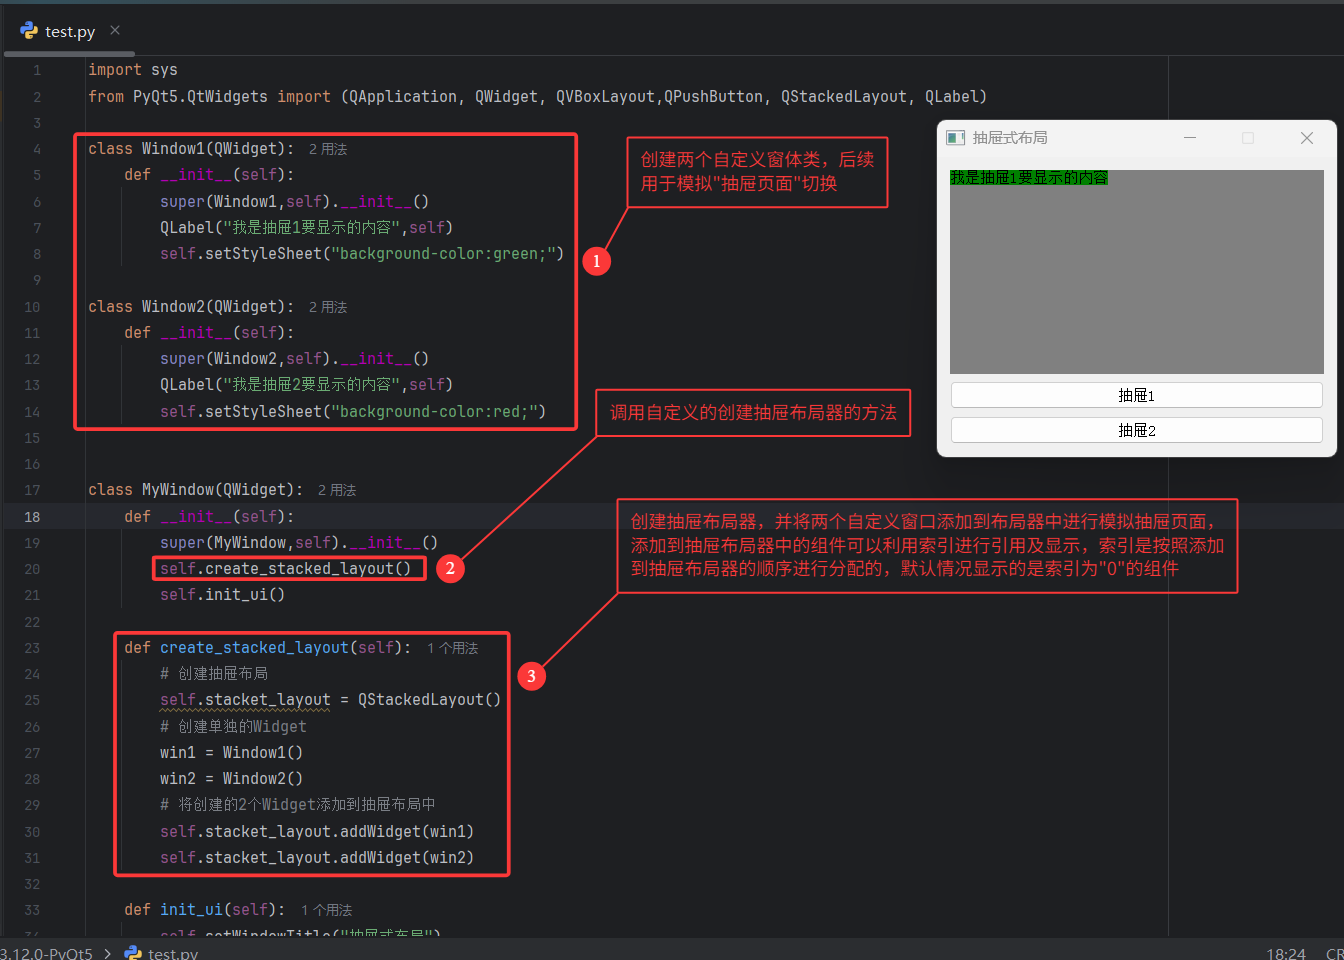
四、QStackedLayout
- 抽屉式布局,提供了多页面切换的布局,一次只能看到一个界面
1. 程序源码
python
import sys
from PyQt5.QtWidgets import (QApplication, QWidget, QVBoxLayout,QPushButton, QStackedLayout, QLabel)
class Window1(QWidget):
def __init__(self):
super(Window1,self).__init__()
QLabel("我是抽屉1要显示的内容",self)
self.setStyleSheet("background-color:green;")
class Window2(QWidget):
def __init__(self):
super(Window2,self).__init__()
QLabel("我是抽屉2要显示的内容",self)
self.setStyleSheet("background-color:red;")
class MyWindow(QWidget):
def __init__(self):
super(MyWindow,self).__init__()
self.create_stacked_layout()
self.init_ui()
def create_stacked_layout(self):
# 创建抽屉布局
self.stacket_layout = QStackedLayout()
# 创建单独的Widget
win1 = Window1()
win2 = Window2()
# 将创建的2个Widget添加到抽屉布局中
self.stacket_layout.addWidget(win1)
self.stacket_layout.addWidget(win2)
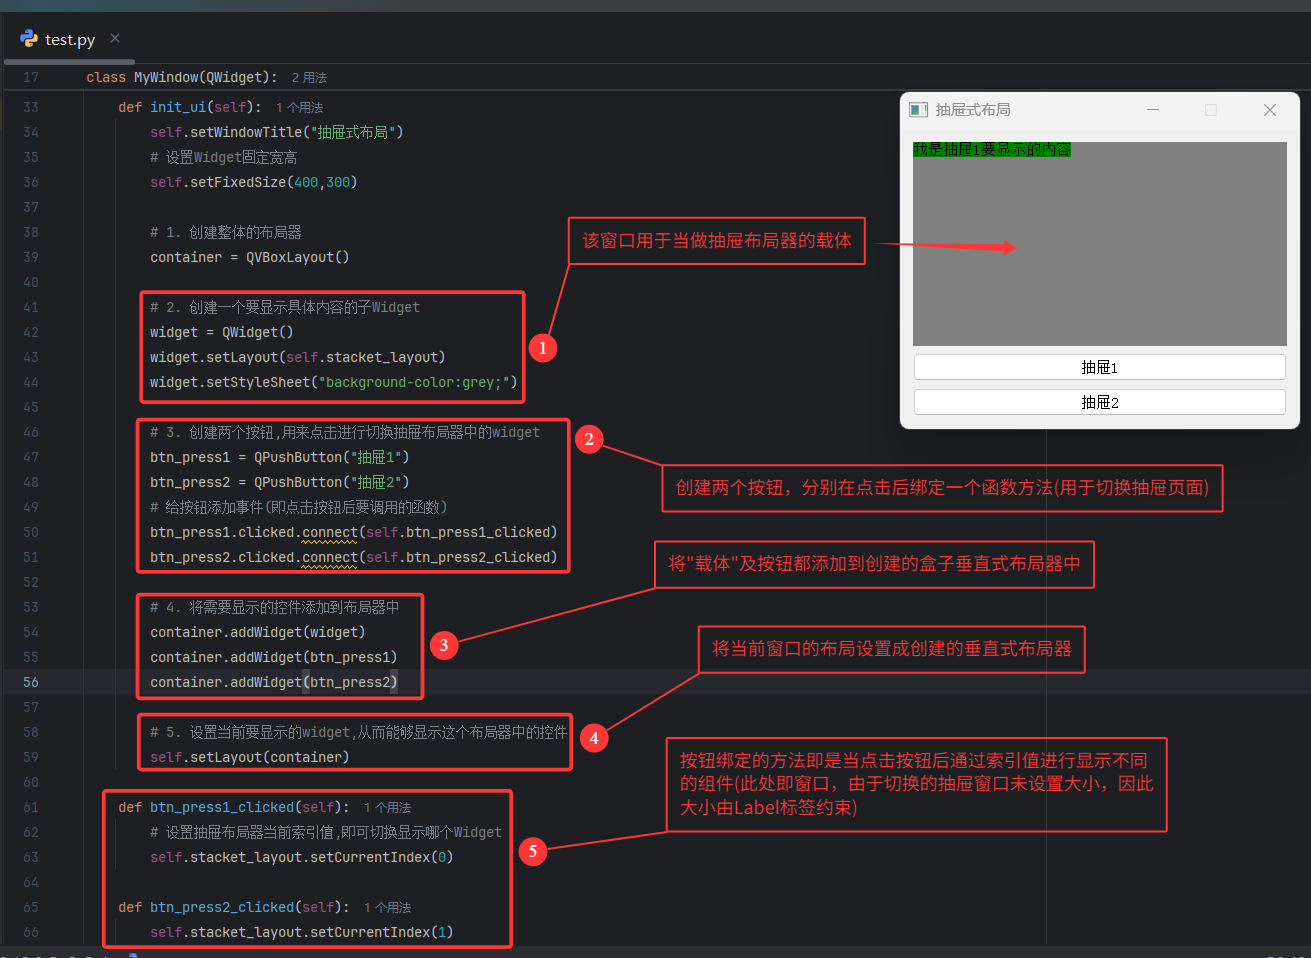
def init_ui(self):
self.setWindowTitle("抽屉式布局")
# 设置Widget固定宽高
self.setFixedSize(400,300)
# 1. 创建整体的布局器
container = QVBoxLayout()
# 2. 创建一个要显示具体内容的子Widget
widget = QWidget()
widget.setLayout(self.stacket_layout)
widget.setStyleSheet("background-color:grey;")
# 3. 创建两个按钮,用来点击进行切换抽屉布局器中的widget
btn_press1 = QPushButton("抽屉1")
btn_press2 = QPushButton("抽屉2")
# 给按钮添加事件(即点击按钮后要调用的函数)
btn_press1.clicked.connect(self.btn_press1_clicked)
btn_press2.clicked.connect(self.btn_press2_clicked)
# 4. 将需要显示的控件添加到布局器中
container.addWidget(widget)
container.addWidget(btn_press1)
container.addWidget(btn_press2)
# 5. 设置当前要显示的widget,从而能够显示这个布局器中的控件
self.setLayout(container)
def btn_press1_clicked(self):
# 设置抽屉布局器当前索引值,即可切换显示哪个Widget
self.stacket_layout.setCurrentIndex(0)
def btn_press2_clicked(self):
self.stacket_layout.setCurrentIndex(1)
if __name__ == '__main__':
app = QApplication(sys.argv)
win = MyWindow()
win.show()
app.exec_()2. 源码讲解